Using Scrivener to track your characters and locations in every scene

The other day I received an email from a friend, who is also an author, asking me whether it is possible to track down the character appearances in every scene when using Scrivener. I thought I’d create a mini tutorial to share this with you.

There is some software out there that lets you assign your characters to every different scene. Not just that: you can also assign a location or specific items that are crucial to your story. yWriter by Spacejock Software is an excellent piece of software which does that and it’s completely free.

However, for those of you Scrivener users the good news is that you can also do this in Scrivener. True, Scrivener does not offer this feature out of the box, but you see this is Scrivener’s biggest selling point: its endless customisation features. All it takes is just a couple of clicks and you can assign your characters, items, locations or whatever else you wish, to every scene and chapter.

This is how to do it on the Windows version but I think it should be more or less the same using a Mac.

1. On the top-right hand side of your project there is the Inspector button.

2. Find the fourth icon (showing the tag).  Click on it and then on Define Meta-Data Fields… (Alternatively, from the Menu: View -> Inspect -> Custom Meta-Data). Note: In Scrivener 3 click on “Custom Metadata” and then either on the button that says “Set up custom metadata” or the three dots. 

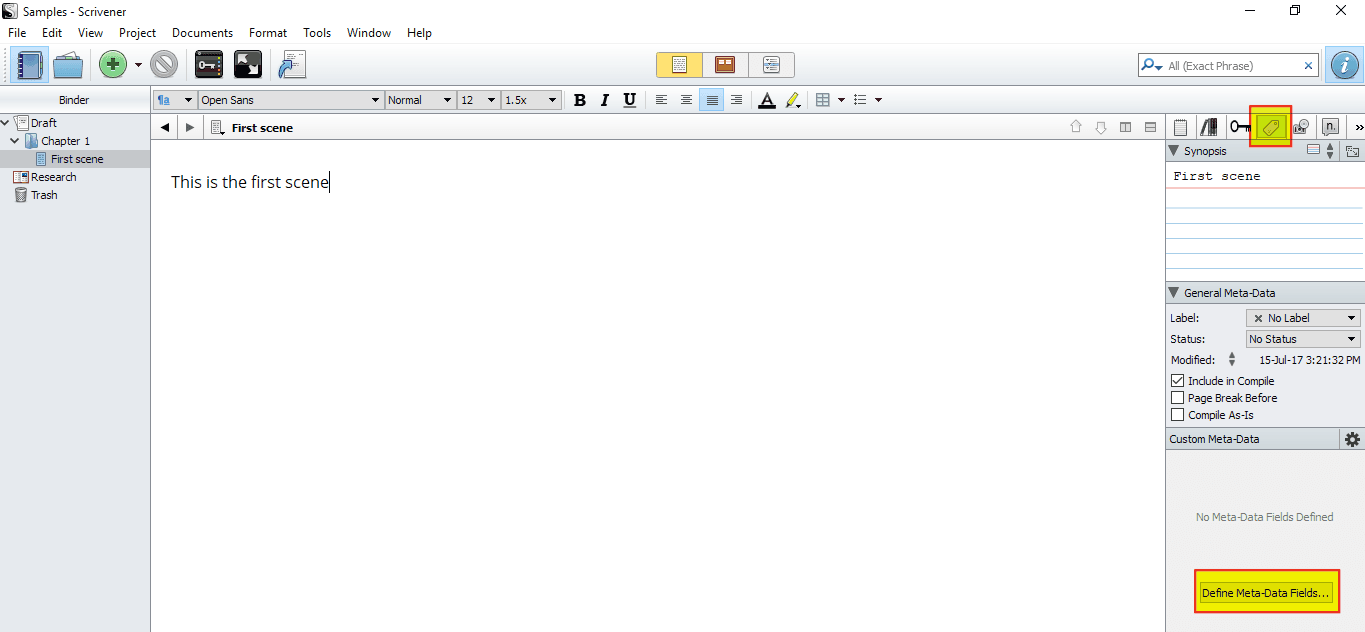
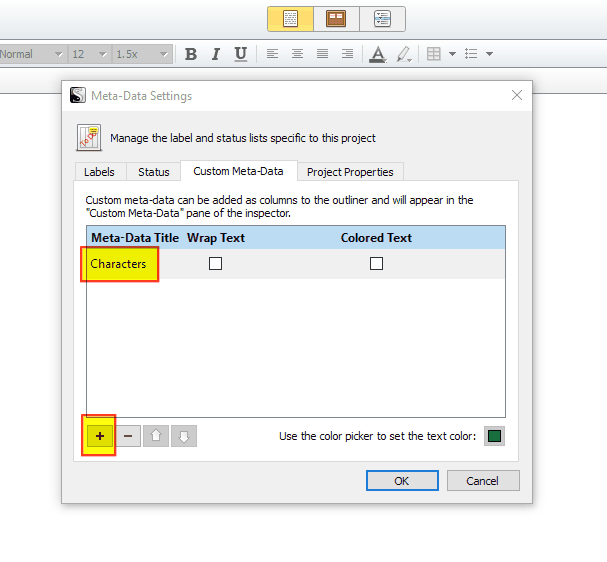
3. Click on the + icon and then in the Meta-Data Title field type in “Characters”. It is a good idea to tick the Wrap Text option so that your data will look more compact later. Click OK.


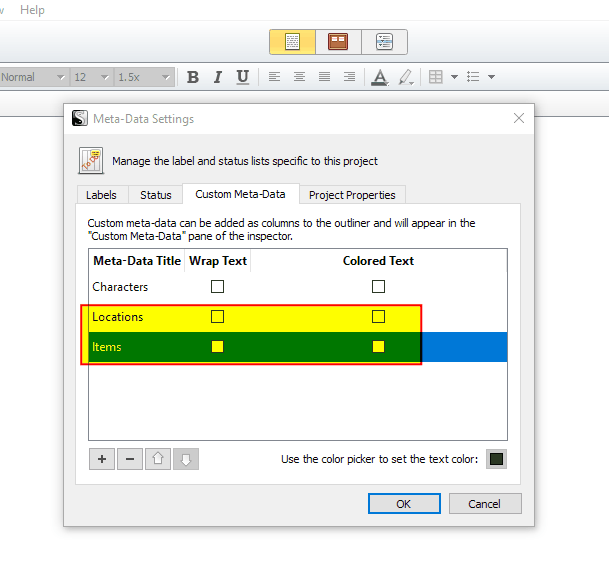
4. Click on the + sign again to add “Locations” and “Items”.

Ok, now having followed the above steps click on your Draft folder (usually the top folder in your binder) and then go to Outline Mode (the third icon on the top-centre of the screen as shown below or alternatively press Ctrl+3)

Click on the little drop-down arrow on the far right of the Outliner window and select the options Characters, Locations and ItemsNote: In Scrivener 3 instead of a drop-down arrow, there is an arrow pointing to the right. Click on that one instead and then select Characters, Locations and Items.

Finally, click on the dropdown arrow on the left to expand your folder structure and reveal your scenes.

That’s it!

Now each scene has all the info you need, regarding your characters, locations and items. Of course, you are free to add any other such fields that you find useful by following the above steps.

Featured photo (c) Literature and Latte website


PS.

I consider Scrivener to be the no.1 essential tool for every author or writer. If you don’t have Scrivener yet, you may wish to buy it out using the links below:

Buy Scrivener 2 for macOS (Regular Licence)

Buy Scrivener for Windows (Regular Licence)


Posted

in

, ,

by

Tags:

Comments

12 responses to “Using Scrivener to track your characters and locations in every scene”

  1. Elmi Avatar

    Thank you! So simple, but I never thought of it… Very helpful.

  2. […] example would be to create a storyboard to function as a chapter outline, something like Scrivener’s cork board, where I’d map out each scene as a different note, complete with character […]

  3. Daniel Avatar

    Marvelous lesson–thanks!

  4. Linda Avatar
    Linda

    Great hint, thank you! I’ve been using keywords to try and achieve the same, but for tracking this is a better way.
    Keywords are handy when you want to make a collection, e.g. just the pages that have character Jim in them… thanks to this I’ve discovered I can do collections with meta-data too.
    I hadn’t thought about the uses of meta-data before, until I read this so thank you!

  5. baddhorse Avatar

    But how do you get the “Character” column to appear? Scrivener doesn’t create it, even though I’ve already added characters under the “Characters” folder.

    1. Ryan D. Tyler Avatar
      Ryan D. Tyler

      I’ve updates the post to include some minor changes in Scrivener 3. Otherwise, if you’re using Scrivener 2, I’ve followed the above steps again and it seems to be working on my computer.

  6. Robert Lowe Avatar
    Robert Lowe

    This is really handy, but I can’t see a way of creating a list of custom metadata, only keywords. Do you have to enter these manually each time?

    1. Ryan D. Tyler Avatar
      Ryan D. Tyler

      Indeed, you have to enter these manually every time for each project, if that’s what you’re asking.

      1. Robert Lowe Avatar
        Robert Lowe

        Hi – no, just one project. What I mean is: I can’t see a way of creating a list of characters that I can add to the scene. I was hoping to be able to tick a list or something that would populate the column with the characters. I can see how to set it up so I can select from a list of alternatives but most scenes have more than one character in, so I’d need to make a list of those. In your example, Tom, Jane. I can only add one character to a scene, Tom or Jane unless I create an entry that is ‘Tom, Jane’.

  7. milu grutta Avatar
    milu grutta

    Hi and thanks for your post. Do I have to inssert the characters for every scene or is there a way to auto populate? I am writing a script so I have characters in every scene.
    Thanks

    1. Ryan van Konsgaard Avatar
      Ryan van Konsgaard

      Sorry for the delay, the website has been undergoing major changes. As far as I know, you will have to insert characters for every scene. 🙁 But I think this gives you better control overall.

  8. Fionnuala Meehan Avatar
    Fionnuala Meehan

    Thank you Ryan, this was getting the better of me and it’s so simple when you’ve explained it above. Really helpful!

Leave a Reply

Your email address will not be published. Required fields are marked *

This site uses Akismet to reduce spam. Learn how your comment data is processed.